In our first story on Photoshop fonts, we covered font and paragraph attributes, plus how to alter the shapes of a word, phrase, or sentence, which (obviously) affects the shapes of the fonts. The instructions targeted Creative Suite users, which means the path to altering a string of text is Edit > Transform > Warp. If you’re using Photoshop version 6.x or 7.x (pre-Creative Suite), the Warp feature is under Layer > Type > Warp Text.
This follow-on article explains how to add swashes, swirls, and flourishes that turn words into a visual feast. Nothing makes typefaces pop more than a few well-placed calligraphic swirls. Even though some fonts already fall into the script or calligraphy categories, they can be difficult to read and are often too decorative for a full word or phrase.
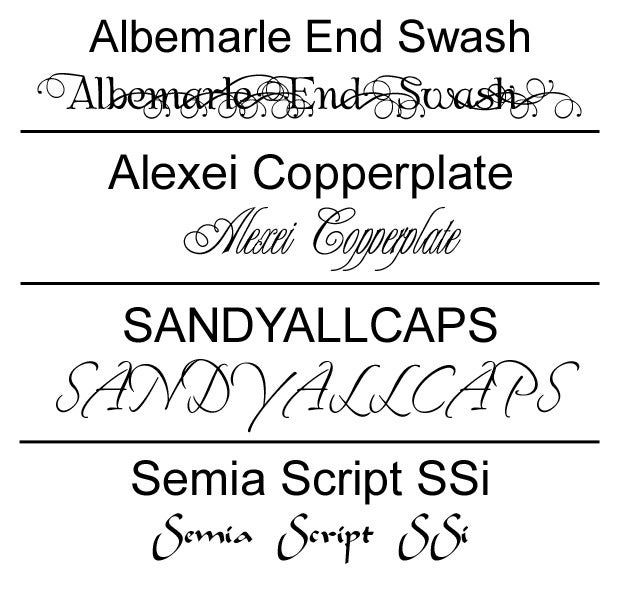
Overdone typefaces
For example, typefaces such as Albemarle End Swash (which has so many swirls & flourishes, it’s unreadable); Alexi Copperplate (which is too cramped for a comfortable read); Sandy All Caps (which would be ok, if it weren’t all capital letters); and Semia Script SSi (which has such a diminished X-height, it almost hurts the eyes) are quite undesirable for display type (i.e., titles or headers), but may be ok if one just uses a single letter (such as the uppercase A in Albemarle End Swash).
Before we continue, a few fundamental terms to know:
- The X-height is the size of the lowercase letters. Notice how small the lowercase letters are in the Semia Script SSi typeface. A 10-point font with a large X-height will look larger on the page than a 12-point font with a small X-height.
- The word “typeface” refers to the design of a group of characters, such as Arial (a sans serif), Times Roman (a serif), Old English (a blackletter), Chancery (a script), and Victorian (a display type). The word “font” refers to all the typefaces within the “font family,” such as Arial Bold, Arial Narrow, Arial Extended, Arial Rounded.
Glyphs & Swashes
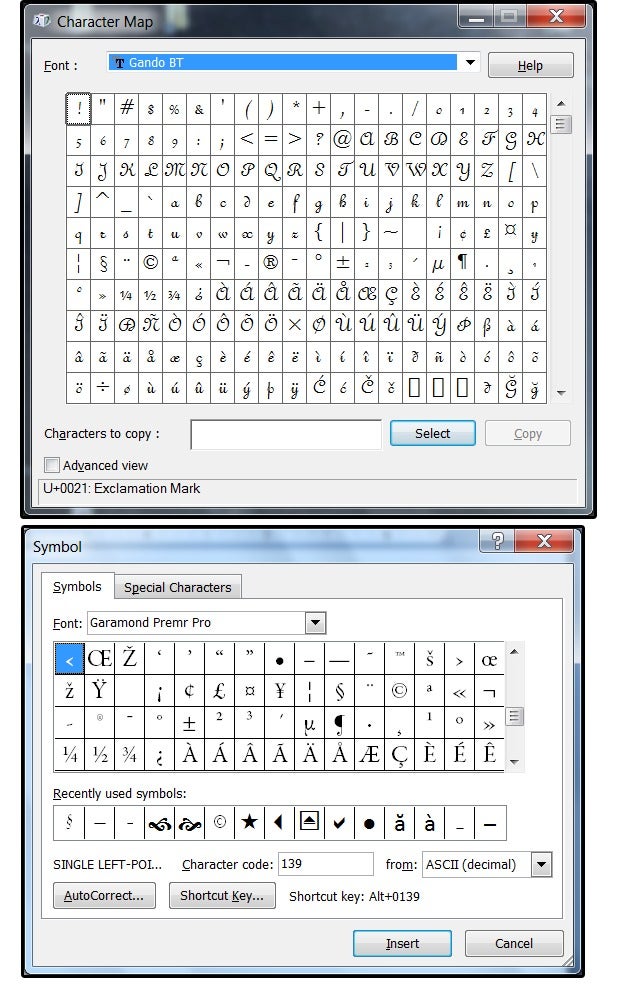
How to access Glyphs & Swashes thru Character Map and Microsoft Symbols
All fonts have Glyphs, which are accessible three ways:
- The Windows Character Map (type character map in the Windows search box and this dialog window opens)
- Microsoft Symbols (Insert > Symbol)
- Window > Glyphs in Photoshop CC (Creative Cloud), which is only available in the monthly subscription service.
The previous Creative Suite versions (1 through 6) offer “Swashes” from the Character window. Click the tiny arrow on the top right corner, then select Open Type > Swash. If Swash is grayed out, then you don’t have any Open Type fonts installed that include swashes such as Lovely Melissa, which comes with 1,372 glyphs and swashes for the reasonable price of $25.
Create custom Swashes
How to access Swashes from Photoshop Creative Suite versions 1 thru 6
Adding a swash or flourish is easy in Photoshop Creative Cloud, but if you don’t have this subscription service, then you must create them manually. The good news is that your swashes will all be custom designs unique to your work.
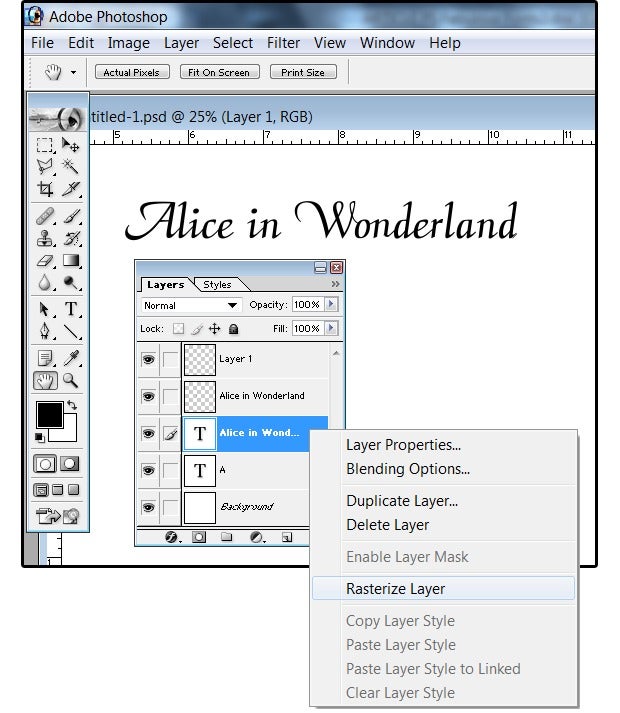
1. Open a New Photoshop file and enter the text Alice In Wonderland on the page. Select a nice script typeface without too much flair, such as Aria Script SSi, at a good working size, such as 48 to 55 points.
2. Let’s create some Initial Swashes (flourishes on the first letter of a word or string of text) and a couple of Terminal Swashes (flourishes at the end of a word or phrase).
3. There are several ways to do this: Draw your flourishes freehand, slice a swirl or flourish from another font and add it to your typeface, or use the Custom Shape tool to select a Shape from the Shapes Library. If you don’t have any Swashes in your Shapes Library, search online for (“Photoshop Shapes Swirls, Flourishes, Swashes”) and download a few Shape files from the many sites that offer free Photoshop Presets.
Freehand Swashes
Connect the letters with Paintbrush, Rasterize the text, then merge those layers
1. First, use the Paintbrush tool to draw simple lines that connect the letters (like handwritten script). Be sure to create a new, separate layer for the lines, so you can easily remove mistakes.
2. To combine these two layers, you must first Rasterize the text layer, then Merge the brush layer with the text layer.
a. Click the text layer in the Layers window.
b. Right-click the text layer and choose Rasterize from the drop-down list.
c. Move the brush layer above the text layer. With the cursor on the brush layer, select Ctrl+E to merge these two layers.
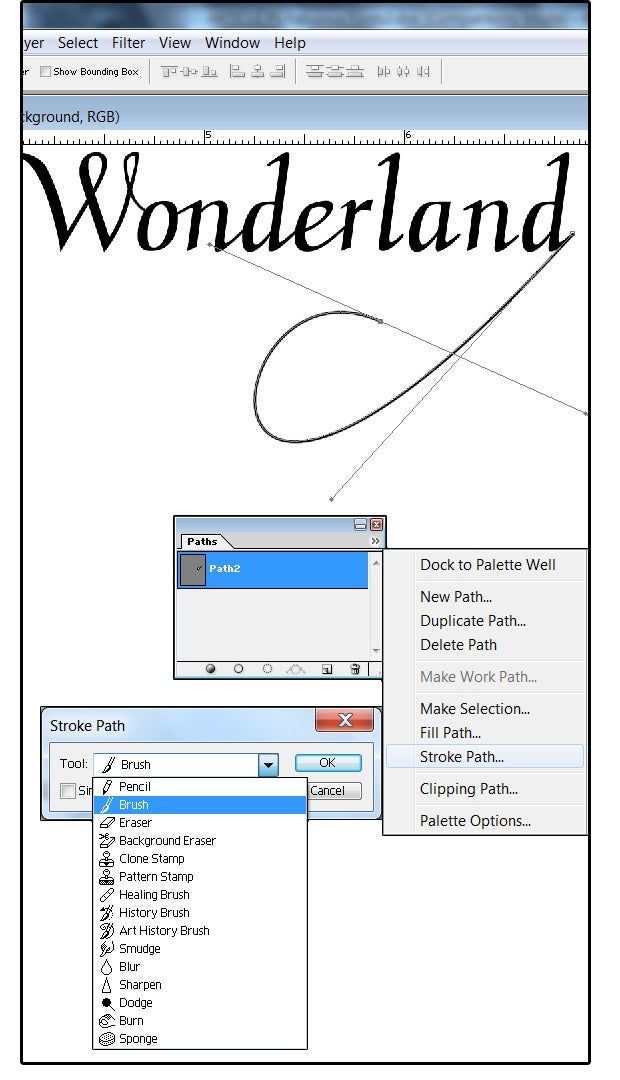
3. Next, select the Pen tool and draw some lines to form a terminal swash on the tail of the last ‘d’ in Wonderland.
a. Click the serif at the bottom right side of the last ‘d’ and then move away from the serif in the direction you want the swash to curl. Hold down the Shift key and click again, then drag the tool to create the first smooth point of the curved segment.
Use the Pen tool to add a terminal swash to the serif of the last letter.
b. Rotate the lines to move the curves back and forth, up and down.
c. Press the Shift key again and click any of the points on the line to create additional segments.
d. Once the swash is complete, choose Window > Path.
e. Select the Set Foreground Color button on the Tools palette and choose a color for your line.
e. In the Paths panel, click the double arrows (under the X) on the top right side of the box.
f. Choose Stroke Path from the list.
g. In the Tool field of the Stroke Path dialog window, select the Brush tool and click OK.
Slice a Swash off another font
1. Enter some uppercase, random text on the screen (include some of the letters in the Alice In Wonderland phrase).
2. Open the Character (fonts) window, click the small arrow beside the font field, scroll through the list of typefaces, and choose a few fonts with decorative swashes (such as Albemarle End Swash, for one). The swashes on both the uppercase and lowercase ‘A’ are excellent for this exercise.
Choose some fonts with decorative swashes
3. Before you can slice off a piece of a typeface, you must first rasterize it (see above).
4. Use the Magic Wand to select the letter A, then deselect everything but the swash. Or use the Lasso tool to outline the swash, then copy and paste the swash somewhere onto your canvas.
5. Move the swash down to the ‘W’ in Wonderland and rotate it until the cut end lines up with the left side of the ‘W.’ Once you’re satisfied with the alignment, trim the excess off both the swash and the letter, then merge the Swash layer with the Wonderland layer.
Use a Custom Shape for a Swash
1. Select the Polygon Custom Shape tool from the Tools palette.
Slice a Swash off the uppercase A & attach it to the Wonderland W.
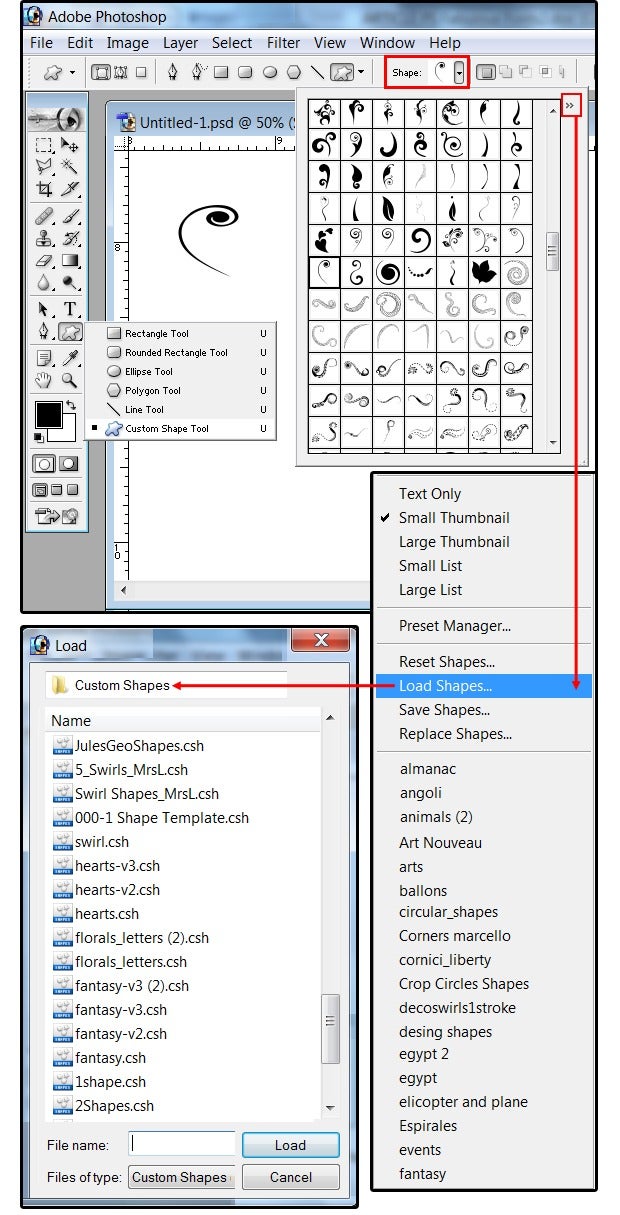
2. Click the down arrow beside the Shape field on the top menu and the Custom Shapes panel appears, showing all the shapes currently loaded. If you cannot find a decorative swash in the current library, click the double arrows on the right side of the Shapes panel.
3. When the Shapes menu drops down, select a Shapes file from the list or choose Load Shapes.
4. The Windows Shapes folder opens with all the Shapes files listed (.csh). Select a file from the list and click the Load button.
5. Move the swirl/swash to the end of Wonderland and rotate it until it attaches evenly to the serif in the last letter ‘d’ (which also attaches to the first swash).
Select a decorative swash from the Custom Shapes panel or load more Shape files.
6. Merge the Swash layer with the Wonderland layer and save the file.
Try lots of typefaces with different swashes, swirls, and flourishes from your Custom Shapes library, or create your own, or mix and match swashes from one font to another. After a very little bit of practice, your fonts will look fantastic—just like the pros.